Well, let's actually say what I'm about to make.
So let's put it that way. Everyone is familiar with Flight Simulator right? Exactly FS2004, FSX, as is particularly heavy for the computer.
The plane that I decided to interface is the 737-800
To be able to interface we will need to choose a "logic" of components and above all choose one of several cases that allow us to interface our home cockpit.
After years of visits I have finally chosen as the "parent" whose website is opencockpits www.opencockpits.com
how their logic is based? How can an external switch turning on a light in Flight Simulator?
Well, what you need to have is:
-Simulator (FS2004)
-L 'aircraft (Boeing 737 PMDG)
-software interface (SIOC for opencockpits, other houses using other software)
-software that allows you to "read" the air like the famous Project Magenta
-L 'hardware that allows to connect the input as a switch (I / O cards)
-recorded FSUIPC version sold for 23 €
-2 / 3 networked computers to allow everyone to communicate between the various parties
-Patience
Space-
-Money
The passion and dedication can slowly "to solve these problems"
No home cockpit builders put up his 737 in 5 days, even spending € 40,000.
also an airline that receives an order for a new plane after many months or even years (most likely). Same thing for the 737 people who decide to build it at home.
I personally, considering the low budget and the large amount of systems I have thought about doing a kind of "merge" or find some way out.
Let's start with the check-list of components
-simulator (I keep)
-L 'air (keep it)
-software interface (I keep it with opencockpits it's free)
-software that allows you to read the air (do not hold it, but I am following the development of this software here www.prosim737.com ) In practice a few months, a new suite-style project magenta will be available at a modest price of 300 € and will be able to interface with all systems. The Beta version is already available and above all it's free updates included. This means that I will be able to interface with most systems and well as controlling a switch, receiving a particular state, or bind to a command output (turn on a switch, a light that shows me is on). But I can explain everything in detail when I get the first components and especially the software will allow me to make them work.
-L 'hardware that allows me to connect (They're coming, and the explanation of the IO card is at the end of this list)
-FSUIPC (keep it)
The rest is easy.
Well, what are the IO cards?

Here is an example of the master card http://www.opencockpits.com/catalog/electronic-cards-iocards-master-digital-inputsoutp-c-21_27.html
These printed circuit boards that can be connected to the PC through the program and the program SIOC FSUIPC can be "read" and interpreted as data and state changes by the simulator.
The master card is the main card (not a credit card:)
Connects INPUT and OUTPUT but does not allow many other things.
The master card can be connected to the PC via parallel port, which now no longer uses the computer, which is why that may be associated with the USB card " http://www.opencockpits.com/catalog/expansion-card- p-37.html? cPath = 21_30 . With this we can connect the master card to the PC via USB.
There are many other cards (such as stepper, servo motor, display) that allow you to realize many things, but for now only talking about these so life is easier for everyone.
I also bought the INPUT CARD " http://www.opencockpits.com/catalog/inputs-connection-p-70.html?cPath=21_27 " that allows me to connect 35 inputs.
OUTPUT I have not bought the card that allows you to have and then connect the outputs of the LEDs that indicate a state. Also from the site
opencockpits I also ordered the first panel of my overhead or the first part I would like to make visible in this picture at the bottom

http://www.opencockpits.com/catalog/lights-panel-p- 177.html? cPath = 23_25_42
This is the panel at the bottom of the overhead lights, which contains the landing lights, lights for the cab, controls, APU, the switches for the ignition of engines and igniter, and the outside lights switches.
clearly I also bought the switch:

http://www.opencockpits.com/catalog/onoff-switch-p-124.html?cPath=24_55
I bought the 8-position rotary switches for the starter
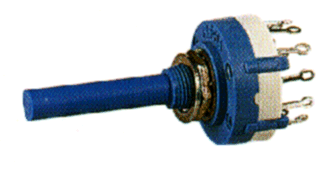
http://www.opencockpits.com/catalog/positions-rotary-switch-p-155.html?cPath=24_55
I bought the "cover" to make all switches realistic as
these for starters http://www.opencockpits.com/catalog/knob-type-p-276.html?cPath=50 http://www.opencockpits and switch covers. com/catalog/switch-units-p-143.html? cPath = 24_55
summary spending
Master card
-1 -1 -1 USB card
Input card
- Panel lights
30 -2 ° 8 rotary positions
-10 white cover lever
-2 starter cover for rotary
- 5 switches ON / OFF switch
-1 TIME / OFF / MOMENTARY
-1 switch ON / OFF / ON
Total € 235
are still waiting for the shipment, and as you can see if everything is gonna be I might just € 235 for the chance to already avoid using the mouse and keyboard to not only turn on all outside lights, but even the starter of engines, landing lights, but especially the taxi lights turn on the APU.
Clearly spending is increased by the expedition from Spain (20 €) and IOCARD (around 100 €), I would also point out that the switches can always be purchased from our trusted hardware in house, and then allows a further reduction.
But you want to put the satisfaction of the track once released to control lights and APU directly by pushing the levers rather than using mouse and keyboard?
For now I have given the guidelines of my project but now once everything will be interfaced as I go on?
Well here is my list in order of preference.
1) Complete the overhead panel after panel of which the first panel of switches must be the energy of the aircraft (APU - GRD-Gen 1 and Gen 2) panel, but has also led and therefore a more complicated discussion that I hope to address in the future thanks to a OUTPUT CARD, software Prosimii and especially the purchase of the advertised package around 120 € (announcers of all overhead)
2) Choose the carpenter of trust that make the backbone of the overhead, which is the frame that allows you to put the panels like this that costs about 220 €.

( http://www.737ngsim.com/index.php?page=shop.product_details&flypage=flypage.tpl&product_id=117&category_id=18&option = com_virtuemart & Itemid = 65 & lang = en )
who may well be self-built home with wood or plexiglass with the most expensive. I'm turning to look for a carpenter in the meantime economic :)
3) Buy the control surfaces of course!
Trhustmaster When I use a joystick, but with time to drive my 737 I will use this bundle for about 280 € (send postage included)

With the usual logic of "gradually"
What makes a special mortgage?
Surely these three components
the MCP or the autopilot

http://www.opencockpits.com/catalog/737ng-without-p-111.html ? cPath = 22_61
The EFIS
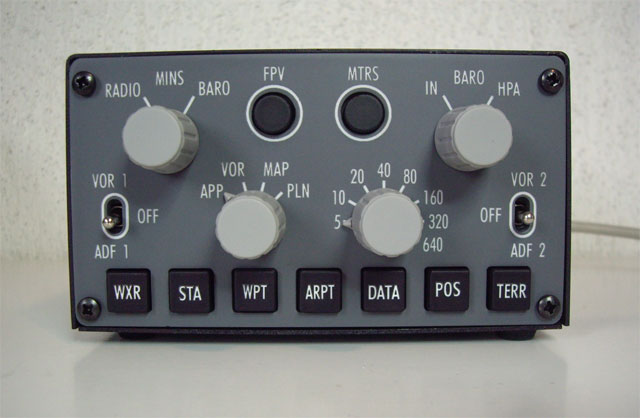
http://www.opencockpits.com/catalog/efis737-mounted-with-p-136.html? cPath = 22_61
and a beautiful FMC

http://www.opencockpits.com/catalog/b737-mounted-ready-p-197.html?cPath=22_61 These three components
meriterrebero a separate discussion, since they can be purchased at other homes, obtaining products of "high bill" but against clearly have a much higher price the best kinds in circulation, or the MCP PRO CPFLIGHT

price around 1200 €
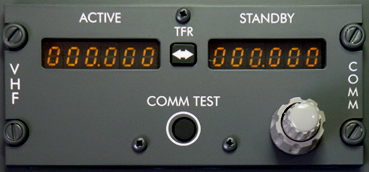
Price € 139 excluding VAT (we around 150 €)
Here the description http://www.opencockpits.com/catalog/com-737-module-pp-p-218.html?cPath=22_61
I hope to have been limited for this first post descriptive, I can not wait to receive the first component is mounted. Once the panel is up and configured (and working perfectly) I'll be happy to show you the pictures and especially the tutorial on how to achieve it!
Greetings to all and leave you with a picture taken by me ...


0 comments:
Post a Comment